
I've been putting a lot of research into this blog (spent most of last night and this morning on it: small tweaks etc.) I decided to help out those interested in starting photography or need help with lighting since this is what has been my biggest interest ever since I saw David Hobbies blog. Definitely worth checking it out by clicking the picture below

My plan for this blog is to post pictures that i take and
also post the lighting diagrams and shot set-up for said image. I will also
post some guides and general tips on the things I have learnt in my research. Hopefully
ill inspire a few people and maybe get famous (don’t we all want that?)
Anyways here is the lighting diagram for the photo I posted
earlier, I didn't take an actual shot of the layout but this should be good
enough.
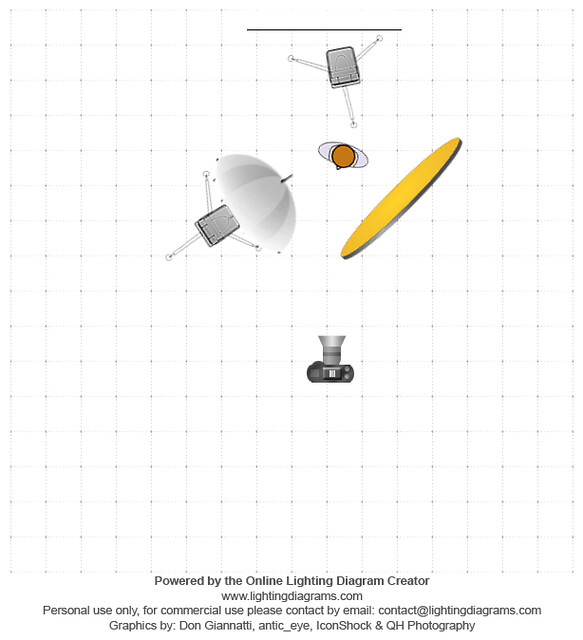
As can be seen in the diagram I have used 2 strobes to take this photo. I had the one strobe facing a white cupboard door more or less straight on. This created the extreme white background. My key light was on the left with a shoot through umbrella (got to love soft light). I then used a gold reflector as my fill light and to add some golden tone to the face and hair.
After some playing around I figured the best way to get these high key shots is to set the lights up in layers (lighting in layers as David would say.) Start with the white background. set the strobe up and do some test shots of the strobe against the white background. Check your histogram (the chart thing when reviewing your images) and make sure you are getting it exposed all the way to the right. most people like to get the white to clip which is what would give the best white (as there will be no detail in the whites) but this can lead to lens flare or a cast over your image if the background is too bright.
Next up set up your key light with your model in place and adjust that to expose your model.
Once that is all done get the model to hold a reflector or have someone else hold it. The reflector fills in those harsh shadows and give a more even look to the image.
The diagram is created via an online lighting diagram creator. This is a rather useful diagram creator as it has many different lighting
modifier symbols and is very easy to use. Go check it out!
No comments:
Post a Comment